
Scheduling students for next year using the Student Scheduler (Schedule Students option) is a continuous process that may be occurring throughout most of the current year.
Note
If the building uses multiple bell schedules, then you will assign house/teams to students and course-sections. The house/teams are associated with bell schedules. A course-section can be assigned to multiple house/teams as long as there is no conflict in the meeting times of the course-section's periods. For more information, refer to About Multiple Bell Schedules and Multiple Bell Schedules and Courses.
Scheduling Preparation
Next-year buildings need to be assigned for next-year scheduling. If your site is not using GeoCode for assigning buildings, proceed to Step 2.
-
To use GeoCode to assign buildings, school staff should make sure that plan areas are defined correctly for next year. For example, if an area has been re-districted to move students from one building to another, make sure that the plan information has been updated.
-
Staff should verify that students are assigned to the correct next building and grade for next-year scheduling.
-
Staff can use the Building Assignment page to assign the next building information based on the plans.
-
Staff may need to review the next-year assignments for students whose assignments were overridden.
When the year-end rollover program runs, the next-year values are moved to the current year fields based on the specified criteria. Because the next-year values themselves are not updated, you must use the Mass Assign Buildings page to make sure that students are assigned to the correct next-year building.
-
-
If the building has multiple bell schedules, then all students must be assigned to a house/team for next year. Make sure the House/Team field on the Next Year Panel of the Registration page is populated.
-
Set up the next school year. In eSchoolPlus, some setup options are defined by school year to allow you to change how students are processed from one year to the next. Setups that are defined by year need to be created each school year. For most setups, you can copy the current year options to the next school year.
-
For more information about the setups that need to be defined for the next school year, refer to the Next Year Preparation List.
-
If the building has multiple bell schedules, refer to Setting Up Multiple Bell Schedules.
-
-
Modify your Building Course Catalog (Scheduling > Courses > Building Courses > Building Course Catalog > click Course link) based on approved curriculum changes. If a course will not be available for next year, change the course's status to inactive.
You can assign house/teams to the course only if specific teams will use the course code. Otherwise, you can wait to assign house/teams to individual course-sections in the Master Schedule.
The Building Course Group and Building Course Sequencing options may also need to be run to update how courses are sequenced for the coming school year.
If your district uses the District Course Catalog, refer to Using the District Course Catalog before using the building course setup options. -
Update the following Scheduling options: Room and Staff.
Before updating the staff catalog, you may need to analyze request information first (Step 6) to determine your building's staffing needs.
You may assign a teacher to a house/team, but you do not need to. You should keep in mind teacher responsibilities when creating your Master Schedule and assigning teachers to course-sections.
Tip
If you will need new hires to teach course-sections but have not yet filled the positions, you can create staff records in advance using generic names, such as NewStaff1 and NewStaff2. Once you fill a staff position, you can update the staff catalog record with the new staff member's information. -
If allowed by your building, teachers can use Teacher Access Center's Recommendations option to recommend course-sections for next year. Note that students must have mark reporting records for the course-sections before the recommendations can be entered. To create requests from the recommendations, use the Load Recommended to Requests option. For more information on the process, refer to Using Course Recommendations to Create Requests.
-
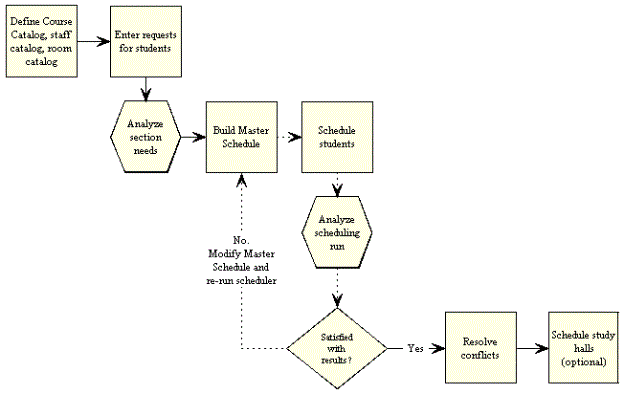
Enter student requests using the following options: Requests (Scheduling > Student Schedules > Student > Requests) and Request Load/Unload/Erase (Scheduling > Student Schedules > Student Utilities > Request Load/Unload/Erase). Requests can also be entered through Home Access Center and Scanning.
You may also run the Student Request Verification report (Scheduling > Student Schedules > Pre-Scheduler Reports > Student Request Verification) at this step so counselors and students can verify the request information. -
Analyze section needs by running one or more of the following Scheduling > Student Schedules > Pre-Scheduler Reports options: Conflict Matrix (Book or Grid), Pre-Assignment Class Lists, Simple Tally, Student Request Detail, and Student Request Summary.
-
Create/update the Master Schedule (Scheduling > Courses > Course Sections > Master Schedule) for the school year.
If the building has multiple bell schedules, select the house/teams that apply to the course-section. For more information on selecting multiple house/teams, refer to Multiple Bell Schedules and Courses.Schedule Students
If the building has multiple bell schedules, keep in mind that you can only schedule courses that are assigned to students' house/teams or that do not have a house/team.
-
Use the Schedule Entry List or Grid page (Scheduling > Student Schedules > Student > Schedule Entry) to lock individual students into specific course-sections.
-
If you need to load a group of students to a particular course-section, run the Scheduled Course Load/Unload/Lock/Erase option (Scheduling > Student Schedules > Student Utilities > Scheduled Course Load/Unload/Lock/Erase).
-
Run the Scheduler Error Scan (Scheduling > Student Schedules > Student Scheduler > Scheduler Error Scan), then correct any errors found.
-
Scan Registration checks that students have a valid house/team for their building.
-
Scan Master Schedule checks that course-sections with multiple house/teams are scheduled for periods that have matching times in the applicable timetables.
-
Scan Master Schedule checks that course-sections with no house/team designation are scheduled for periods that have matching times in all timetables.
-
-
If needed, update the Scheduling Parameters page (Scheduling > Student Schedules > Student Scheduler > Schedule Students Parameters) for your building.
-
Run the Schedule Students option (Scheduling > Student Schedules > Student Scheduler > Schedule Students).
-
Analyze and verify student schedules by generating one or more of the following Scheduling > Student Schedules > Post-Scheduler Reports options: Student Conflict Analysis, Unscheduled Request Detail, and Unscheduled Request Summary.
-
If you are satisfied with the results of the scheduler, skip to Step 19. If you want to re-run the scheduler, continue to the next step.
-
If you want to be able to return to the current setups after making changes, back up the scheduling run by running the Back Up/Restore option (Scheduling > Student Schedules > Student Scheduler > Backup/Restore).
Caution
We do not recommend using this option if you are attempting to use the scheduler in the current school year. If you restore data, you will lose changes for Scheduling and Mark Reporting made between the time that you backed up and restored data. -
If you need to change Master Schedule information, run the Scheduled Course Load/Unload/Lock/Erase option (Scheduling > Student Schedules > Student Utilities > Scheduled Course Load/Unload/Lock/Erase) to erase scheduled courses that are not locked.
-
Repeat Steps 7 - 17 until satisfied with the scheduler run.
-
Resolve conflicts in student schedules using the Schedule Entry List or Grid option Scheduling > Student Schedules > Student > Schedule Entry, as well as the Schedules Mass Update option (Scheduling > Utilities > Student Mass Updates > Schedules Mass Update).
Schedule Study Halls (optional)
-
Run one or both of the following Scheduling > Student Schedules > Post-Scheduler Reports options to determine how to create your study halls: Free Period Analysis and Free Time Detail.
Both reports will use the timetable assigned to the student's house/team in determining which periods are free for the student. -
Create/update study halls in the Master Schedule option (Scheduling > Courses > Course Sections > Master Schedule).
If the building has multiple bell schedules, select the house/teams that apply to the course-section. For more information on selecting multiple house/teams, refer to Multiple Bell Schedules and Courses. -
Run the Schedule Study Halls option (Scheduling > Courses > Course Sections > Master Schedule) to assign study halls to students' schedules.
If the building has multiple bell schedules, then only courses assigned to the student's house/team or those with no house/team may be added to a student's schedule. The Override House/Team field will be set to unchecked and will be disabled. The timetable associated with the student's house/team will be used when determining the student's schedule status.Print Schedule Information
-
Generate Class Lists (Scheduling > Student Schedules > Post-Scheduler Reports > Class Lists for distribution to teachers.
-
Generate Student Schedules (Scheduling > Student Schedules > Post-Scheduler Reports > Student Schedules) for distribution to students.
-
Once school has started and schedule changes have begun, periodically run the Add-Drop By Teacher report (Scheduling > Student Schedules > Post-Scheduler Reports > Add-Drop by Teacher) to inform teachers of changes in their classes.
Manage Staff Date Tracking Data (if required by State Reporting)
If your school uses the staff date tracking functionality for state reporting, you may need to generate staff date tracking records for your Master Schedule staff assignments. Additionally, you may need to add student linking records for secondary staff assignments.
To find out what you are required to enter for state reporting, refer to your state reporting documentation or your state reporting team lead at PowerSchool.
-
Use Generate Course Staff Date Tracking Data (Scheduling > Utilities > Setup Mass Updates > Generate Course Staff Date-Tracking Data) to build the staff date tracking records for the building's Master Schedule.
-
If your state reporting uses the Student Linking option to associate students with the secondary staff members responsible for services that require a student to be pulled out of class or a staff member to be pushed into class to work with the student, manage your secondary staff assignments for these services.
-
Use the Master Schedule to add the secondary staff member to the course-section where the student will be pulled out or the teacher will be pushed in. Make sure you use the appropriate start date for the staff date tracking record.
-
Use the Student Linking option to associate students with the secondary staff member. Check the box for the students who are receiving services from the secondary staff member during the course-section.
-