
Many school districts are required to manage student schedules for elementary schools to accurately report student and staff data for state reporting purposes. This topic provides guidelines and suggestions to help you set up scheduling data and quickly get students scheduled for courses.
The procedures that follow assume you need to report class information, but that you do not need to report the class that a student is in at a specific time of the day. If you need to create schedules that follow a bell schedule, refer to the Next-Year Scheduling Process Overview.
Planning
-
Review your reporting needs and determine how many classes you need to report for each student. For example, you may be able to schedule one core class where students work on multiple content areas with the same teacher and then separate classes for the specials. Or you may need to create separate courses for each content area.
-
Determine how you want to define course codes in the District Course Catalog option (Scheduling – Courses – District Courses – District Course Catalog) or Building Course Catalog option (Scheduling – Courses – Building Courses – Building Course Catalog).
Course codes may have a mix of letters and numbers. If you are reporting courses for state reporting, you can use the state course numbers or define your own. You could use the grade level and content area as part of your naming structure. In the following example, the first number represents the grade level, and the subsequent numbers represent the content area, for example:
101 - First Grade Language Arts
102 - First Grade Reading
103 - First Grade Math
201 - Second Grade Language Arts
202 - Second Grade Reading
and so forth. -
Consider how you want to schedule classes. The Scheduling system will not allow you to save a student's schedule if there are any conflicts where the student has more than one course scheduled for the same period and day. If you do not need to report the exact times that a student is in a class, then you can avoid potential conflicts by creating a simplified schedule where all sections of a content area meet in the same period. For example, the Language Arts classes meet in period 1, the Reading classes in period 2, and the Math classes in period 3, and so on.
-
Determine if you can use the Master Schedule section to help you identify the teacher for the class. Although the section defaults to the next sequential number for the course, you can change it to another numeric value. For example, you can use the teacher's room number as the section number to make it easier to identify the course-section to schedule for a student who needs to be scheduled for a teacher's class.
Setting up Scheduling and Mark Reporting
-
Use the Scheduling Intervals option (Administration – Scheduling Setup – Setup – Scheduling Intervals) to define a scheduling interval. Typically, schools use an interval code of Y with a description of Yearly.
-
Use the Scheduling Building Configuration option (Administration – Scheduling Setup – Setup – Scheduling Building Configuration) to define the building's Scheduling Configuration.
-
Current Interval: Set to the interval code defined in Step 1.
-
Maximum Timeslots: Set this to the number of classes you intend to schedule for each student. For example, if you need to report 12 classes for each student, enter 12.
-
Default Duration Type: Enter the duration defined for the calendar and marking periods for the building. For example, M for Marking Period or Q for Quarter.
-
Default Max Seats: Enter the maximum number of students that are allowed in a class.
-
Use Ungraded Option: Typically, only high school buildings would need to designate a class as ungraded when a student is auditing a class. If students cannot audit classes, do not select this checkbox.
-
-
Use the Marking Periods option (Administration – Registration Setup – Calendars – Marking Periods) to enter scheduling and mark reporting values for the marking periods.
-
Scheduling Interval: Set to the interval code defined in Step 1.
-
Report Card Run: Typically, there is one report card run for each marking period.
-
Term: The term is used by high school buildings for GPA calculations, but it is a required field. You may enter the same number as you entered for the Report Card Run field.
-
-
Use the Scheduling Periods option (Administration – Scheduling Setup – Setup – Scheduling Periods) to define the scheduling periods.
-
Use the Scheduling Timetables option (Administration – Scheduling Setup – Setup – Scheduling Timetables) to define the building's timetable. Select Standard mode, then enter the following in the Auto-Update Standard Cycle Days panel:
-
Enable Automatic Update: Select the checkbox to automatically generate the timetable's times and periods.
-
Period Length: Enter the approximate time for each period.
-
Passing Time: Enter the passing time allowed between periods. These minutes are not counted as instructional time.
In Timeslot 1's Start Time field, enter the starting time for the timeslot, press <Tab> to populate all of the timeslots for the cycle day, then assign the periods in the Period fields. If needed, repeat this for each cycle day displayed, then click Save.
-
-
Use the MR Building Configuration option (Administration – Mark Reporting Setup – Setup – MR Building Configuration) to define the building's Mark Reporting setup. Set the Current RC Run to 1, then complete the other fields as needed.
-
Use the Level Table option (Administration – Mark Reporting Setup – Setup – Level Table) to define the building's valid marks.
-
Use the Mark Types option (Administration – Mark Reporting Setup – Setup – Mark Types) to define the types of marks that print on the report card or are used for state reporting purposes. If your state reporting requirements require you to report a final mark, define the mark type in the RC Mark Types Issued Once Per Year section.
Setting up courses
You can define courses at the district level if all elementary schools use the same course codes. Otherwise, you must use the Building Course Catalog to define the classes for each elementary school building. The following procedure assumes all course codes are the same regardless of the building.
-
Use the Building Course Catalog option (Scheduling – Courses – Building Courses – Building Course Catalog) to define the courses using the course code schema suggested in Step 2 of the Planning procedure.
-
If you have a District Course Catalog (Scheduling – Courses – District Courses – District Course Catalog, use the District Course Catalog Utility (Scheduling – Utilities – Setup Utilities – District Course Catalog Utility) to upload the courses from the building catalog to the district catalog. Be to assign the Building Type your district uses for elementary schools. The courses will also be distributed to the catalogs for the appropriate buildings.
Note:
If you do not have a District Course Catalog, you must set up the Building Course Catalogs for each elementary building. -
Use the Master Schedule option (Scheduling – Courses – Course Sections – Master Schedule) to define the course-sections.
-
Select a course, then change the default Section number if you are using section numbers to help identify each teacher's class.
-
On the Session Information panel, define the session. To add another session, click Add on the first session's title bar, then enter the information for the next session.
-
If your state reporting requirements require you to track dates for staff members, you must save the course-section session before you can enter the primary staff teacher. After you save, the Primary Staff field is a hyperlink. Click it to open the Staff Date Tracking window.
-
Scheduling students
This procedure describes using the Scheduled Course Load/Unload/Lock/Erase utility to schedule students. There are other options you can use, but this may be the most efficient way to schedule elementary students.
-
If you plan to use primary homeroom to schedule students, make sure students are assigned to the correct primary homeroom.
-
Select Scheduling – Student Schedules – Student Utilities – Scheduled Course Load/Unload/Lock/Erase.
-
On the Scheduled Course Load/Unload/Lock/Erase page's Prompts panel, select the Course Building, select Mass Load as the Action, enter the first day of the school year as the Add Date, then complete the panel's other fields as needed.
-
On the Run panel, select Now if you want to run the utility immediately or Once to set a Time and Date.
-
In the Courses section, enter each course-section you want to schedule.
-
Use the Filter panel to set up criteria for selecting the students being scheduled. For example:
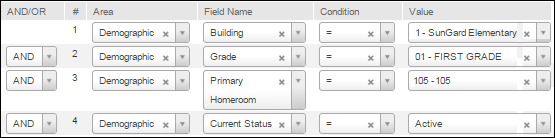
-
Click Load to display the students on the Selected Students panel.
-
Click Run.
-
Repeat Steps 3 - 8 for each group of students you need to schedule.