Use this page to define the marks that are issued in a building. For each mark, the level table defines how the mark is printed, whether or not the mark is used in honor roll and GPA calculations, and how the mark should be processed in average calculations.
Display marks and levels for building
-
Select Administration > Mark Reporting Setup > Setup > Level Table.
-
If a search page displays, select the building.
-
If the detail page displays for a building other than the one you want, use Search to select another building.
-
-
To display details for a specific level, set the Display Type field to Level and select the level. Then click Load.
Change Valid Marks
You must define a mark before you can specify how it is used in the level table.
Define marks for building
-
Select Administration > Mark Reporting Setup > Setup > Level Table.
-
If a search page displays, select the building.
-
If the detail page displays for a building other than the one you want, use Search to select another building.
-
-
To generate numeric marks, click

(Additional options) in the Mark Information panel and select Auto-Generate Marks. Enter the low and high numbers for the marks to generate and click OK. Click Yes at the prompt indicating that alpha marks will be moved to the end of the list.
-
To add marks, enter the mark in the blank row at the bottom of the list.
-
Repeat Step 4 until all marks have been defined.
-
Click Save.
Add marks to existing level tables
-
Select Administration > Mark Reporting Setup > Setup > Level Table.
-
If a search page displays, select the building.
-
If the detail page displays for a building other than the one you want, use Search to select another building.
-
-
Add the mark code at the bottom of the list of marks.
-
To change the order of the mark, use the tab on the left of the Mark field to drag and drop it to the appropriate location.
-
Repeat Steps 2-3 until the marks are added.
-
Click Save.
-
In the Selection panel, select Level for Detail Type field and select the level to update. Then click Load.
-
Update the mark information as needed for the marks you added.
-
Click Save.
-
Repeat Steps 7-8 until you have defined how the marks are used in all levels.
Change the order of marks
-
Select Administration > Mark Reporting Setup > Setup > Level Table.
-
If a search page displays, select the building.
-
If the detail page displays for a building other than the one you want, use Search to select another building.
-
-
To change the order of a mark, use the tab on the left to drag and drop it to the appropriate location.
-
Repeat Step 2 until the marks are ordered appropriately.
-
Click Save.
Delete a mark
You can only delete marks which have not been entered for students.
-
Select Administration > Mark Reporting Setup > Setup > Level Table.
-
If a search page displays, select the building.
-
If the detail page displays for a building other than the one you want, use Search to select another building.
-
-
Select the

(Delete) checkbox for each record to delete.
-
Click Save.
Change Level Information for Marks
You must define a mark before you can specify how it is used in the level table.
There is also a mass update tool available to set values for multiple marks. For the procedure to use that option, refer to Mass Update Level Table Procedures.
Add levels
Tip
The Level Table page includes Mass Update and Copy options to make it quicker to set up mark information.
After you save a level table, use the Mass Update to update multiple marks to the same value for a field and to set the point value for many marks based on a specified scale. For more information on mass updating levels, refer to Mass Update Level Table Procedures.
Set up the first level table as closely as possible to how other levels should be defined. Then use the Copy option to create the additional levels for the building.
-
Select Administration > Mark Reporting Setup > Setup > Level Table.
-
If a search page displays, select the building.
-
If the detail page displays for a building other than the one you want, use Search to select another building.
-
-
Click Add in the page's title bar.
-
In the General panel, define the level code and description.
-
In the Mark Information panel, define how marks are used in calculations and printed on reports.
-
Click Save.
-
To create an additional level, repeat Steps 2-5 or copy the existing level.
Change mark information for a level
-
Select Administration > Mark Reporting Setup > Setup > Level Table.
-
If a search page displays, select the building.
-
If the detail page displays for a building other than the one you want, use Search to select another building.
-
-
In the Selection panel, select Level for Detail Type field and select the level to change. Then click Load.
-
Make changes as needed.
-
Click Save.
Copy a level
-
Select Administration > Mark Reporting Setup > Setup > Level Table.
-
If a search page displays, select the building.
-
If the detail page displays for a building other than the one you want, use Search to select another building.
-
-
In the Selection panel, select Level for Detail Type field and select the level to copy. Then click Load.
-
Click Copy.
-
On the Copy Level window, use the Destination fields to specify the building, level code, and description to use for the new level tables.
-
Click OK.
Delete a level
-
Select Administration > Mark Reporting Setup > Setup > Level Table.
-
If a search page displays, select the building.
-
If the detail page displays for a building other than the one you want, use Search to select another building.
-
-
In the Selection panel, select Level for Detail Type field and select the level to delete. Then click Load.
-
Click

(Delete). After the level is deleted, the page refreshes with the Marks details displayed.
Fields
Selection Panel
Use the fields in this panel to select the mark or level table information to display. After you change selection options, click Load to display the selected records.
|
Field |
Description |
|---|---|
|
Detail Type |
Select to display the valid marks or the level table details. Marks - to display the list of valid marks and define the mark order.
|
|
Level |
If the Detail Type field is set to Level, then select the level table to display. |
|
Marks Fields |
The following fields display if Marks is selected in the Selection panel. |
Mark Information Panel
Use the tabs on the left to order marks. Drag and drop a mark to move it to a new position.
|
Field |
Description |
|---|---|
|
Mark |
Mark that students can earn for a course. You may enter numeric or character values; for example, you may issue letter grades such as A, B, C, D, and F or numeric grades such as 100, 99, 98, and so forth. All marks that may be issued must be defined. |
|
State Code Equivalency |
If your district's state reporting requirements require you to translate local marks into state codes, enter the state value. Otherwise, leave this field blank. |
|
Course Completed |
Checked if the mark indicates a course is completed. This value is used for state reporting purposes; it is not used by mark reporting calculations to determine whether courses are completed. Refer to your state reporting documentation to determine whether you need to set this value. |
|
Active |
Checked if the mark is active for the current year. |
|
Level Fields |
The following fields display if Level is selected in the Selection panel. |
General Panel
|
Field |
Description |
|---|---|
|
Level |
Code for the level table. Small Integer |
|
Description |
Description for the level table. For example, Non-Weighted or Weighted. Character/255 |
|
Active |
Checked if the level table is active for the current year. |
|
PESC Code |
Code developed by the Postsecondary Electronic Standards Council (PESC) that corresponds to this level table. Select the code for this level table. |
Mark Information Panel
|
Field |
Description |
|---|---|
|
Mark |
Displays the mark code. |
|
Point Value |
Point value associated with the mark. For example, if your building uses a 4.00 grading scale, a mark of A may be worth 4.00 in a non-weighted level table and 4.50 in a weighted level table. For more information on how point values are used to calculate GPAs, refer to Calculating Grade Point Averages. |
|
Passing Mark |
Checked if the mark indicates that the student is passing the class. If a student receives a passing mark, the Course Credit Calculation assigns earned credit for the class. |
|
Include in Honor Roll |
For each honor roll defined for the building, checked if the mark should be included in the honor roll calculation. This setting determines if the mark is included when calculating student GPAs for the honor roll. It does not exclude the mark from being used to determine qualification or disqualification based on marks received. For more information on how marks can be used to qualify or disqualify students, refer to Honor Roll Setup Page. Report Card Eligibility and Report Card At Risk setups also display in this section. |
|
Include in GPA |
For each GPA type, checked if the credit for a course should be included in the GPA calculation for a course. |
|
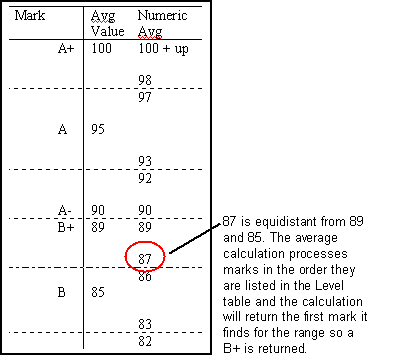
Average Using Type |
Indicates how the mark should be processed when calculating a mark based on an average setup. The mark can be converted to a numeric value or processed as an exempt or set mark. For detailed examples of how these options affect average calculations, refer to How the Level Table Average Using Fields Affect Mark Averages. Select: Exempt - to process the mark as an exempt mark. The calculation will either issue an error or ignore the mark and associated report card run based on how the average setup is defined.
|
|
Average Using Value |
The Mark Averages Calculation and Load Gradebook Averages options use this field to:
|
|
Caution |
If your school uses Load from Gradebook or Load Gradebook Averages to calculate marks, then caution should be taken if the scale used in the Average Using Value fields is not a 100 point scale. Marks calculated based on Gradebook assignments use a 100 point scale.
For mark types calculated based on average setups, do not use the raw Gradebook values to calculate averages. In the average setup, do not select the Average Uses Raw Gradebook Values checkbox. Raw gradebook values are on a 100 point scale and it is invalid to combine two different scales to calculate an average. |
|
Print Values |
Specifies the value to print on the report card, progress report, and transcript. By default, the mark is used, but you can change the value to print. |
|
Add-On Values Value |
Value to add to the final GPA if the student receives this mark. For example, you can select to add.25 to the GPA for an A in an AP course. The add-on value is added after the GPA is calculated. For more information on how add-on values (also referred to as add-on points) are used to calculate GPAs, refer to Calculating Grade Point Averages. |
|
Add-On Values Weight by Credit |
Checked if the add-on value should be adjusted based on the amount of attempted credit. Otherwise, the full add-on value will be added to the GPA. For more information on how add-on values (also referred to as add-on points) are used to calculate GPAs, refer to Calculating Grade Point Averages. |
|
Color Levels |
Specifies the color level for Unified Classroom integration. Select: 1 - Red - for Red
|