
Initial Setup
On the Configure page:
The Data Exchange Settings will be displayed at the top left. Configure will be highlighted under Data Exchange Settings.
-
If you are not on the Configure page, click the gear icon at the top right to navigate there:
-
This applies to Pilot districts and other districts with prior DEX setup.
-
If you have an outdated profile, DEX may show the Dashboard header with an error message. Clicking the gear icon will take you to the Configure page, where you can update your profile.
-
-
The Configure page consists of:
-
Basic Settings
-
Profiles
-
LEA
-
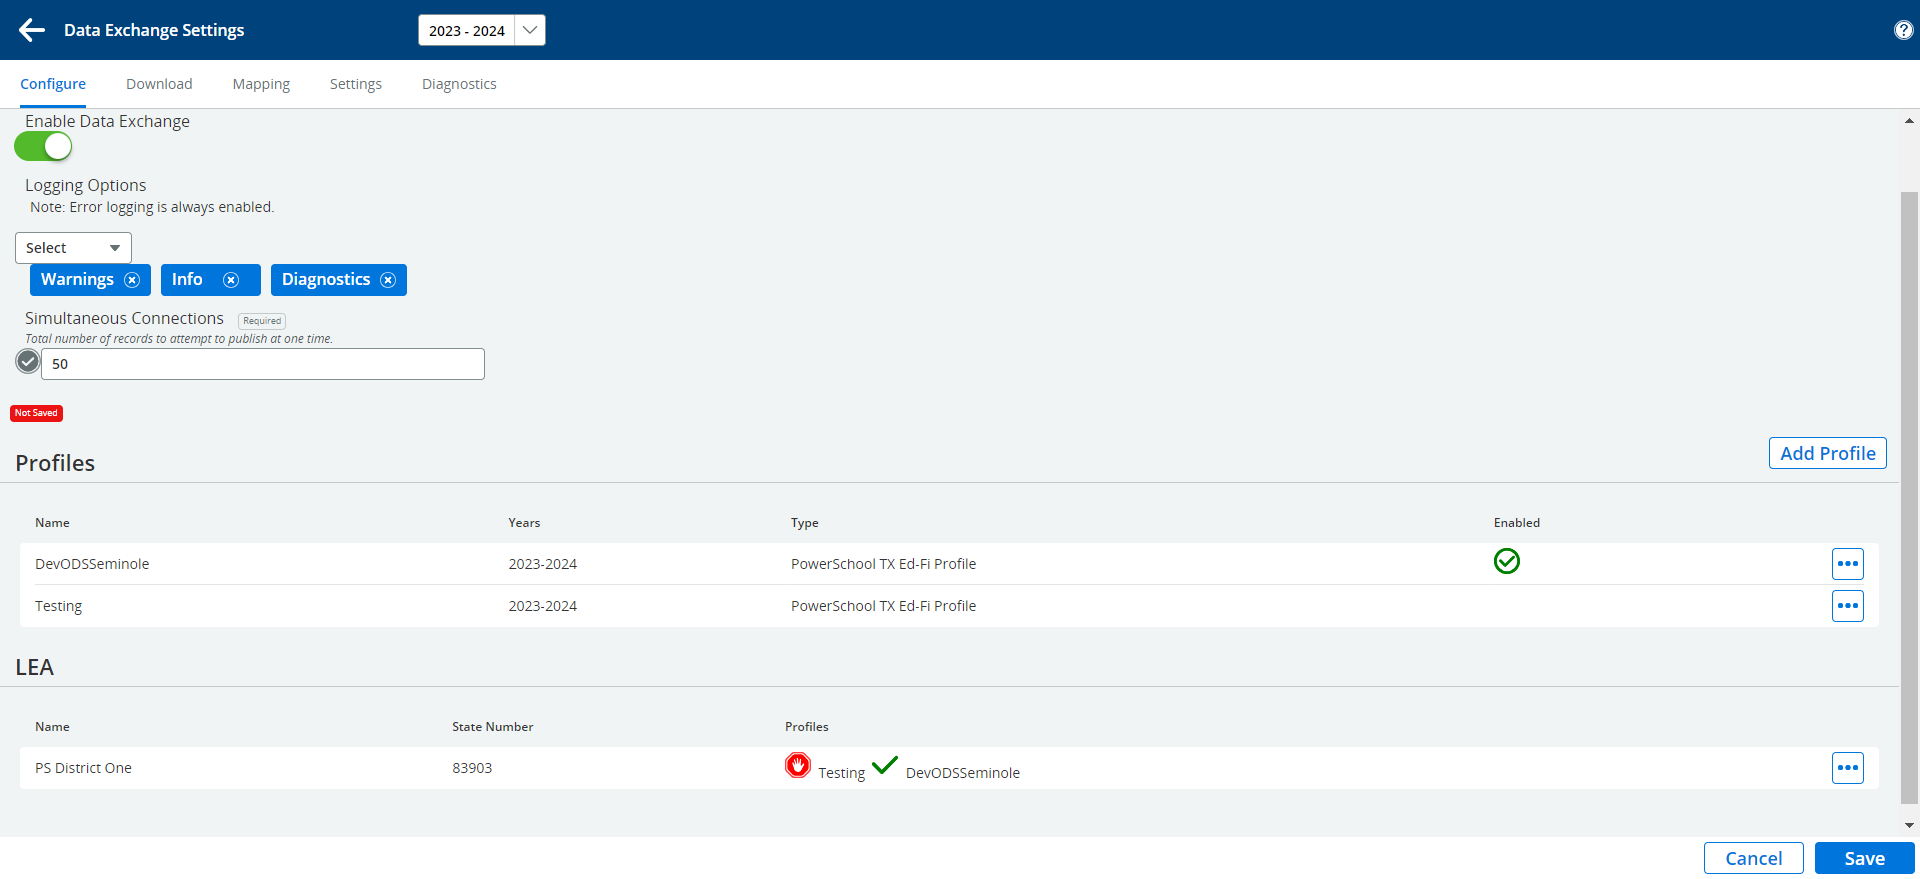
Basic Settings
a) Enable Data Exchange: Turn this setting ON.
b) Logging Options: Retain the default Error logging options. Additional selections are not usually needed.
c) Simultaneous Connections: Set this to 50 initially. Acceptable range is 20 to 50.
-
Setting Simultaneous Connections too low can lead to poor publishing performance.
-
Setting Simultaneous Connections too high can cause frequent publishing errors (error 500).
Profiles
-
Reusing an Existing Profile: Click the More … option to the right of the profile name and select Edit.
-
Adding a New Profile: Click Add Profile on the right side of the screen to display the Profile dialog.
a) Enable Profile: Check this option to enable the profile.
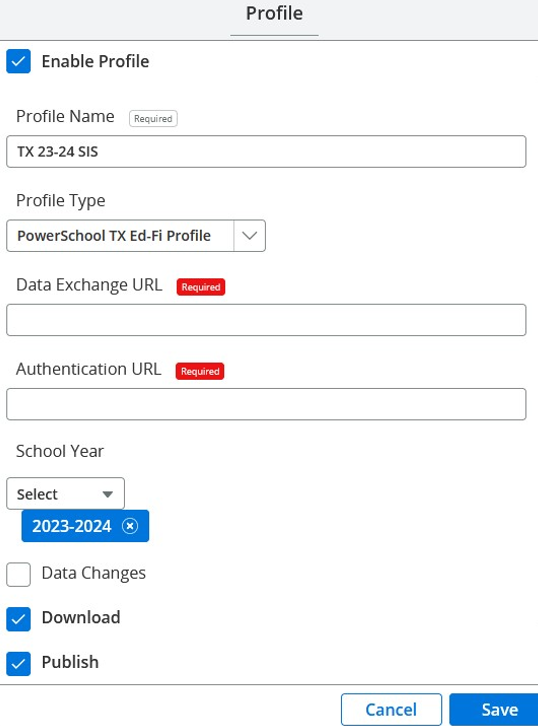
b) Profile Name: Enter a name for the profile that will display in your DEX UI, e.g., TX 23-24 SIS.
-
Maximum 100 characters, but a short name is recommended.
-
If you use a separate HR profile, ensure the name indicates whether it is the HR or SIS profile.
c) Profile Type: Select the type of profile you are adding.
-
Note: You cannot change the profile type after saving.
-
For the SIS profile, select PowerSchool TX Ed-Fi Profile or eSchoolPlus TX Ed-Fi Profile.
-
For an HR vendor profile (not the SIS), select Staff and HR TX Ed-Fi Profile. PowerSchool ERP uses the Staff and HR TX Ed-Fi Profile.
-
If publishing Staff and/or Finance data from the SIS as a separate profile, select PowerSchool TX HR Ed-Fi Profile or eSchoolPlus TX HR Ed-Fi Profile.
-
Creating a separate profile for HR Staff and Finance data is optional and only necessary for UI separation.
-
Currently, all users with access to the general SIS profile will also have access to this, but user-based access to specific profiles will be added in the future.
-
d) Data Exchange URL and Authentication URL: Enter the API URL from the TEA DMC for both fields.
-
If reusing an existing profile, verify and update the URLs if necessary.
e) School Year: Select the school year.
-
Districts reusing a profile from a prior year will need to add the current school year.
f) Publishing Options: Check or uncheck the following options as desired:
i) Data Changes: Leave this option unchecked during initial setup and publishing.
-
When checked, data changes made in the SIS or HR system are automatically published in near-real-time and/or during the weekday nightly process.
ii) Download: Check this option to enable.
-
This is required to download necessary data from the state, such as code sets, schools, and courses.
-
Downloads are excluded from automatic publishing and are always user-initiated.
iii) Publish: Check this option to enable.
-
This is required to publish data.
-
Includes the weekend update process, which republishes all changes.
-
Uncheck this option only if you need to stop all publishing activity.
iv) The weekday nightly publishing is enabled or disabled as part of Data Changes, while the weekend publishing is independent of it.
g) Click Save.
LEA Connection Setup
Initially, this option will be blank and will automatically populate when a profile is created.
-
To edit, click the More… option on the right and select Edit’. This displays the LEA profile connection dialog box.

a) District Name: This is the header, with profiles defined for the district.
-
The ‘Select’ dropdown is inactive.
-
Profiles with no connection data are displayed on the right with a ‘+’ on the left of the profile name.
-
Profiles with connection data are displayed on a blue background with an ‘x’ on the right of the profile name.
-
The ‘x’ on the right is for removing the profile relationship.
-
A panel with previously entered data is displayed below for each profile with a blue background.
-
b) Select a Profile for Setting Up Connection:
-
Click the ‘+’ next to the profile name to add a new connection panel for profiles with no previous connection data.
-
Scroll down to the connection panel for the profile.
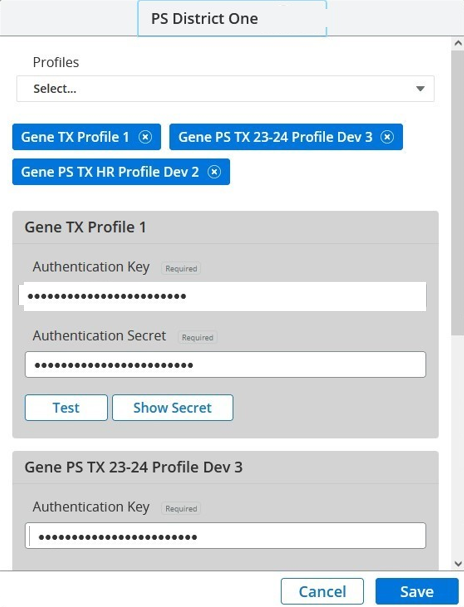
c) Enter Authentication Key and Secret: Use the credentials received from TEA.
-
If reusing an existing profile, enter the new Key and Secret if they have changed.
d) Click ‘Test’:
-
You should see a ‘Profile Successfully Connected’ message with an ‘Enable Profile’ switch.
-
If the test is not successful, verify the key and secret, and check for leading/trailing spaces.
-
If still not successful, contact TEA or vendor Support.
e) Enable Profile:
-
The ‘Enable Profile’ switch only appears after a successful test.
-
Caution: This is an important step and easy to overlook.
f) Click ‘Save’.
Save Configuration Settings
Click ‘Save’ at the bottom right of the Configuration page.
a) The Publishing Dashboard for the configured profile will be displayed.
b) The name of the profile will be shown at the upper left.
c) Publishing groups, categories, and entities will be displayed. These are described below under ‘Publishing Data’.
Once you define a profile, launching DEX Cloud will open the publishing Dashboard as the landing page.

After completing initial configuration the following setup steps need to be completed before you can begin publishing.
-
Download
-
Mapping
-
Settings
-
Diagnostics