
Search for Students
Create and run a simple search
-
Select Search on any student page. The Student Search page also displays when you select a menu option for a student page but have not yet selected a student.
-
Select Simple mode.
-
On the Search Criteria panel, use the Simple Search Criteria fields to define your search.
In the Last Name, First Name, and Middle Name fields, you can search for names containing the characters entered. For example, the characters ander in the Last Name field match Alexander, Anderson, and Vanderbilt.
Or, you can select the Sounds Like checkbox to search for student names that sound similar to the entered name. -
Click Load at the top right of the page to run the search. The records retrieved are displayed on the Search Results panel.
Create and run an advanced search
-
Select Search on any student page. The Student Search page also displays when you select a menu option for a student page but have not yet selected a student.
-
Select Advanced mode.
-
On the Search Criteria panel's Advanced Search Criteria section, select an Area and then a Field Name, Condition, and Value to define a criteria row.
As you start a row, a blank row is added at the bottom for entering another row. You also can use the Actions icons as follows:
|
Copy |
Copies the current row to a new row below it. You should modify one or more fields in this row to create a unique statement. |
|
Add |
Adds a blank row above the current row. |
|
Delete |
Deletes the current row. |
-
Define the relationship between your criteria rows, using the following Boolean operators:
|
AND |
Returns records when the current statement and preceding statement are true; that is, both statements must be satisfied. |
|
OR |
Returns records when the current statement or preceding statement is true; that is, only one statement must be satisfied (though both can be true). |
-
To group two or more conditions, select their checkboxes, then click Group at the top of the column to group OR conditions so that the system can consider them separately within a set of conditions.
Example of grouping conditions
To search for all students who are in Building 2 and have either Mr. Alpine as a counselor or Mrs. Carlisle as a disciplinarian, you need to group the latter two conditions so the building condition applies to both of them.
First, set up your criteria rows: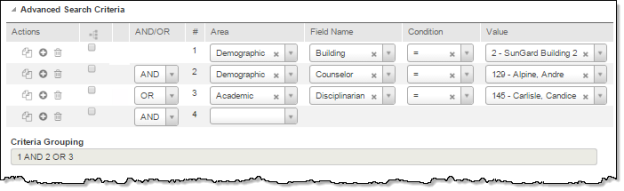
Advanced Search Criteria fields
Now, select the Group checkboxes for rows 2 and 3, then click the Group column header to group the two rows: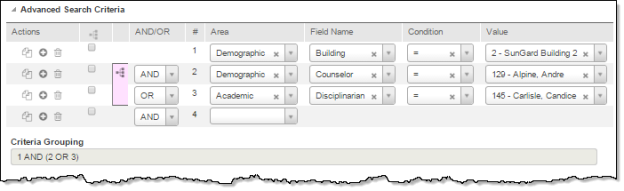
Advanced Search Criteria Grouped statements
The shaded bracket indicates the grouping. Note that the checkboxes are cleared, enabling you to add another group or "nest" a grouping within a group. To undo the group, click the Group icon inside the bracket.
The Criteria Grouping bar will express this as 1 AND (2 OR 3), which means the system first will consider students by building (row 1) and then by either counselor or disciplinarian (row 2 or 3). -
Repeat Steps 3-5 for each additional row.
-
Complete the List Field Selection and Sort Field Selection sections as needed. For details, refer to the following procedures for selecting students and adding fields.
-
Click Load at the top right of the page to run the search. The records retrieved are displayed on the Search Results panel.
Edit your search criteria
After you run a search, you can refine the results by editing your criteria.
-
Click the Search Criteria panel's title to expand the panel.
-
Change the settings in any of the panel's sections.
-
Click Load at the top right of the page to run the search. The records retrieved display on the Search Results panel.
Navigate the records found in your search
-
Generate search results using one of the previous procedures.
-
On the Search Results panel, locate the student you want.
Use the navigation bar at the top or bottom of the Search Results panel to view subsequent pages of records:
Search Results Navigation panel -
Change the sorting of your records by clicking the respective column header on the Search Results panel. Clicking the column header again reverses the order.

Search Results panel -
To access a student's records, click the student's name.
Select a student after running a search
-
On the Student Search page's Search Results panel, click the student's name link.
-
On any student page, use the Student Navigation tool below the Home icon and Menu button to advance from student to student. For more information on this feature, refer to Student Information Bar.
Customize Search Results
Add fields to your search results
-
Set up your search criteria.
-
In the List Field Selection section, select the Area (table), then select the Field Name of the field to add.
As you start a row, a blank row is added at the bottom for entering another row. -
Repeat Step 2 to add another field, if needed.
You also can use the following Actions buttons:
|
Add |
Adds a blank row above the current row. |
|
Delete |
Deletes the current row. |
-
Click Load at the top right of the page to run the search. The records retrieved are displayed on the Search Results panel.
Define the sort order of your search results (advanced search only)
-
Set up your advanced search criteria.
-
In the Sort Order Selection section, select the Area (table), then select the Field Name of the field to sort by.
As you start a row, a blank row is added at the bottom for entering another row. -
Select the field's Sort Order:
|
Ascending |
Sorts in alphabetical order (A-Z). |
|
Descending |
Sorts in reverse alphabetical order (Z-A). |
-
Repeat Steps 2-3 to add another sort row, if needed
You also can use the following Actions icons:
|
Add |
Adds a blank row above the current row. |
|
Delete |
Deletes the current row. |
-
Click Load at the top right of the page to run the search. The records retrieved are displayed on the Search Results panel
Define the number of records displayed per page
The Navigation Bar displays at the top and bottom of the Search Results panel. Besides using the bar to navigate through the records found in a search, you also can set the number of records to display in a page.
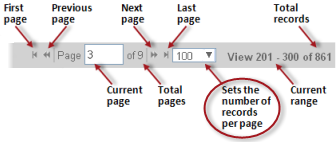
In the field indicated, click the 
Update Student Values
Notes
-
If you are updating a field that is program-tracked, you can choose to update the existing program records or close the existing record and open a new one.
You cannot use this option to update a field if it is program-tracked and is absolutely or completely linked to entry/withdrawal or another program field. -
You cannot update the Personal area's Locker Number and Locker Combination fields for students assigned to buildings where Assign Lockers is selected on the Registration Building Configuration page.
Edit individual fields in your search results
The following procedure applies to any field on the Search Results panel whose column header includes the Edit icon. Only certain fields allow editing.
-
Run a search. Be sure to list the fields you want to display in your search results. For details, refer to the procedure for listing additional fields.
-
To access a column's fields for editing, click Edit in the column header, then change the fields as needed.
-
As you make changes, an Undo icon (a small triangle) displays at the field's upper left. To cancel the change for an individual field, click the icon.
-
To cancel all changes made to a column's fields, click Cancel in the column header.
-
-
Repeat Step 2 for other columns.
-
Click Save to save your changes to the current page.
-
If you are updating a field that is program-tracked, the Program Tracking Setting window displays. In the window, specify how program tracking records should be updated. You can replace the current record or close it and open a new record. If you select to close and re-open the program, specify the end date and start date.
-
As needed, display the next page of records, then repeat Steps 2-5. Note that you must click Save as you complete each page or your changes for the page will be lost.
Mass update fields in your search results
The following procedure applies to any field on the Search Results panel whose column header includes the Edit icon. Only certain fields allow editing. Note that in Steps 2-8, the Fill Settings option applies changes to columns in the first page of students, while in Step 8, the Fill Results option repeats the same changes in subsequent pages.
-
Run a search. Be sure to list the fields you want to display in your search results. For details, refer to the procedure for listing additional fields.
-
To access a column's fields for editing, click Edit in the column header.
-
Click the Additional Options icon at the top right of the Search Results panel, then select Fill Settings.
-
In the Fill Settings window's Fill Action field, select:
|
Do not fill |
Prevents filling the column's fields. |
|
Fill |
Fills all fields in the column with a selected Field Value. This replaces existing data and fills all blanks. |
|
Fill blanks |
Fills blank fields with a selected Field Value without affecting fields that contain data. |
|
Clear |
n's fields, rendering them blank. |
-
Click OK to apply the action from Step 4 and close the window.
-
Repeat Steps 3-5 for each additional column you wish to change.
-
Click Save to save your changes to the current page of records.
Caution
Before saving, carefully review your changes to avoid losing significant data. -
If you are updating a field that is program-tracked, the Program Tracking Setting window displays. In the window, specify how program tracking records should be updated. You can replace the current record or close it and open a new record. If you select to close and re-open the program, specify the end date and start date.
-
To apply the same changes to another page of students:
-
Navigate to the page.
-
Click the Additional Options icon at the top right of the Search Results panel.
-
Select Fill Results.
-
Click Save.
Repeat this step for each page where you want to apply the changes.
-