
Following are the procedures for running simple and advanced searches. For more information on searches, refer to Advanced Searches.
Search for Records
Create and run a simple search
-
Select Simple mode at the top of the page.
-
On the Search Criteria panel, use the Simple Search Criteria fields to define your search.
-
Character fields accept partial entries. For example, the characters ander in a Last Name field match Alexander, Anderson, and Vanderbilt.
-
Number and code fields require specific entries.
-
-
Click Load at the top right of the page to run the search. The records retrieved are displayed on the Search Results panel.
Create and run an advanced search
-
Select Advanced mode at the top of the page.
-
On the Search Criteria panel's Advanced Search Criteria section, define a criteria row by completing the following fields:
Area
Select the table to search.
Field Name
Select the field to search
Condition
Select the condition to use. The conditions available for selection vary depending on whether a field accepts numbers or characters.
Value
Select the value or values to use, depending on the condition.
-
As you start a row, a blank row is added at the bottom for entering another row. You also can use the Actions icons as follows:
Copy
Copies the current row to a new row below it. You should modify one or more fields in this row to create a unique statement.
Add
Adds a blank row above the current row.
Delete
Deletes the current row.
-
Define the relationship between your criteria rows, using the following Boolean operators:
AND
Returns records when the current statement and preceding statement are true; that is, both statements must be satisfied.
OR
Returns records when the current statement or preceding statement is true; that is, only one statement must be satisfied (though both can be true).
-
To group two or more conditions, select their Group checkboxes, then click the Group column header. Grouping enables the system to consider OR statements separately within a set of other conditions.
-
Repeat Steps 2-4 for each additional row.
-
After entering your criteria, complete the List Field Selection and Sort Field Selection sections as needed. For details, refer to the next two procedures.
-
Click Load at the top right of the page to run the search. The records retrieved are displayed on the Search Results panel.
Filter content to limit results
Use this procedure when a panel includes the ability to limit results with criteria rows.
-
Define a criteria row by completing the following fields:
Area
Select the table to search.
Field Name
Select the field to search
Condition
Select the condition to use. The conditions available for selection vary depending on whether a field accepts numbers or characters.
Value
Select the value or values to use, depending on the condition.
-
As you start a row, a blank row is added at the bottom for entering another row. You also can use the Actions icons as follows:
Copy
Copies the current row to a new row below it. You should modify one or more fields in this row to create a unique statement.
Add
Adds a blank row above the current row.
Delete
Deletes the current row.
-
Define the relationship between your criteria rows, using the following Boolean operators:
AND
Returns records when the current statement and preceding statement are true; that is, both statements must be satisfied.
OR
Returns records when the current statement or preceding statement is true; that is, only one statement must be satisfied (though both can be true).
-
To group two or more conditions, select their Group checkboxes, then click the Group column header. Grouping enables the system to consider OR statements separately within a set of other conditions.
-
Repeat Steps 2-4 for each additional row.
Edit your search criteria
After running a search, you can refine the results by editing your criteria.
-
If needed, click Search Criteria (the title) to expand the panel.
-
Change the settings in any of the panel's sections.
-
Click Load at the top right of the page to run the search. The records retrieved are displayed on the Search Results panel.
-
If desired, save the new criteria. For details, refer to the procedure for saving a search as a favorite.
Navigate the records found in your search
-
Generate search results using one of the previous procedures.
-
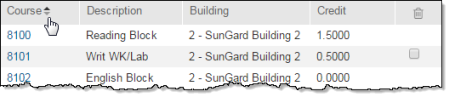
On the Search Results panel, locate the record you want.
Use the navigation bar below the Search Results bar to view subsequent pages of records: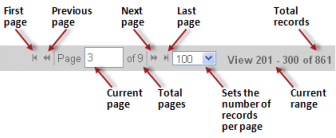
-
Change the sorting of your records by clicking the respective column header on the Search Results panel. Clicking the column header again reverses the order.
-
To access a record, click the appropriate link.
Customize Search Results
Add fields to your search results
-
Follow the procedure for setting up simple or advanced search criteria.
-
In the List Field Selection section, select the Area (table), then select the Field Name of the field to add.
As you start a row, a blank row is added at the bottom for entering another row. -
Repeat Step 2 as needed. You also can use the following Actions icons:
Add
Adds a blank row above the current row.
Delete
Deletes the current row.
-
Click Load at the top right of the page to run the search. The records retrieved are displayed on the Search Results panel.
Define the sort order of your search results (advanced search)
-
Follow the procedures for setting up advanced search criteria.
-
In the Sort Order Selection section, select the Area (table), then select the Field Name of the field to sort by.
As you start a row, a blank row is added at the bottom for entering another row. -
Select the field's Sort Order:
Ascending
Sorts in alphabetical order (A-Z).
Descending
Sorts in reverse alphabetical order (Z-A).
-
Repeat Steps 2-3 to complete another row. You also can use the following Actions icons:
Add
Adds a blank row above the current row.
Delete
Deletes the current row.
-
Click Load at the top right of the page to run the search. The records retrieved are displayed on the Search Results panel.
Define the number of records displayed per page
The Navigation Bar displays at the top and bottom of the Search Results panel. Besides using the bar to navigate through the records found in a search, you also can set the number of records to display on a page.
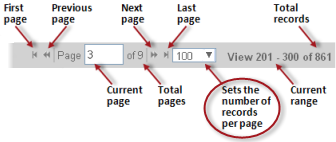
In the field indicated, click the 
Generate a report of Search Results
If the Search Results panel displays the Export to PDF and Export to Excel icons, a report of the results can be generated.
Generate a report for the displayed search results
-
Click one of the following on the Search Results panel to display the Report Options dialog:

To generate a report in PDF format.

To generate an Excel spreadsheet.
-
In the Options section, enter a report title.
-
If sort columns were specified in the Search Criteria, select page break options in the Break Setup section.
-
If combined columns display in the Search Results, select display options in the Column Setup section. Select one of the following for each field:
Code Only
Display just the code.
Description Only
Display just the description.
Separate Columns
Display the code and description in separate columns.
Combine Columns
Display the code and description in the same column.
-
Click OK.
-
When processing is complete, the results depend on the format selected:
PDF
Displays the report in a separate browser tab. Use your browser's tools to save or print the file.
Excel
Saves the spreadsheet to your Downloads folder.
The reports are also saved to the user's eSchoolPlus report directory.