
Following are the procedures for creating and maintaining Master Schedule course information. For field descriptions and other information, refer to Master Schedule Page.
View and print course-section records
View a course-section's Master Schedule record
-
Select Scheduling > Courses > Course Sections > Master Schedule.
-
On the Master Schedule Search page, click the Course link for the course-section you want to view. You may need to run a search for the course-section.
-
Review the course-section's information.
-
Click Search to return to the search page.
View session information on the Master Schedule Search page
This procedure adds columns to the search page to display fields for each session information for each course-section.
-
Select Scheduling > Courses > Course Sections > Master Schedule.
-
On the Master Schedule Search page, run a search for the courses you want.
-
On Search Results title bar's far right, click

(Additional options), then select Show session information.
-
Review the course-sections.
-
To return the page to its original display, click
(Additional options) on the Search Results title bar's far right, then select Hide session information.
View a course-section's District or Building Course Catalog record
-
Select Scheduling > Courses > Course Sections > Master Schedule.
-
On the Master Schedule Search page, click the Course link for the course-section you want to view. You may need to run a search for the course-section.
-
Click
(Additional options) on the upper right, then select one of the following:
-
District Course Catalog - to view the course-section's record in the District Course Catalog window.
-
Building Course Catalog - to view the course's building record in the Building Course Catalog window..
-
-
To close the window, click OK at the bottom right.
-
Click Search to return to the search page.
View scheduling conflicts for course-sections
-
Select Scheduling > Courses > Course Sections > Master Schedule.
-
On the Master Schedule Search page, click the Course link for the course-section you want to view. You may need to run a search for the course-section.
-
Click
(Additional options), then select Conflicts.
-
Review the information in the Course Conflicts window.
-
The Session Information section shows the course-section's periods, cycle days, and marking periods.
-
The Course Conflicts sections shows each course that will conflict with the course-section.
-
The Selections section's Conflict Type field enables you to limit the conflicts displayed by Teacher or Room. The default is All.
-
-
To close the window, click OK at the bottom right.
-
Click Search to return to the search page.
View a session's seat detail information
-
Select Scheduling > Courses > Course Sections > Master Schedule.
-
On the Master Schedule Search page, click the Course link to display the course-section on the Master Schedule page. You may need to run a search for the course-section.
-
In the Session Information panel's General Information section, click
(Additional options), then select Seat Detail.
-
Review the Seats section's information, which includes the total seats available for the session during each marking period.
-
To close the window, click OK.
View a session's classification weight information
-
Select Scheduling > Courses > Course Sections > Master Schedule.
-
On the Master Schedule Search page, click the Course link to display the course-section on the Master Schedule page. You may need to run a search for the course-section.
-
In the Session Information panel's General Information section, click
(Additional options), then select Weight Detail.
-
Review the Classification Weights section's information, which includes the total weight available for the session during each marking period.
-
To close the window, click OK.
Print the Master Schedule List report
-
Select Scheduling > Courses > Course Sections > Master Schedule.
-
On the Master Schedule Search page, run a search for the courses you want to include in the report.
-
On Search Results title bar's far right, click
(Additional options), then select Master Schedule List Report.
The Master Schedule List Report window displays: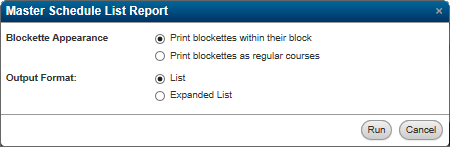
-
Enter your selections for how you want the report to print.
-
Click Run to generate the report.
-
To retrieve the report, click Tasks/Reports on the navigation bar to display the Tasks and Reports page, then click the report's link to display a PDF file of the report on a new tab.
-
To print the report, position your pointer in the middle of the tab near the bottom to display the PDF task bar, then click Print.
-
In the Print window, entering your printing settings, then click Print.
Generate the Master Schedule List in Excel or PDF format
-
Select Scheduling > Courses > Course Sections > Master Schedule.
-
On the Master Schedule Search page, run a search for the courses you want to include in the report.
-
Click one of the following on the Search Results panel to display the Report Options dialog:
|
Field |
Description |
|---|---|
|
Export to PDF |
To generate a report in PDF format. |
|
Export to Excel |
To generate an Excel spreadsheet. |
-
In the Options section, enter a report title.
-
If sort columns were specified in the Search Criteria, select page break options in the Break Setup section.
-
If combined columns display in the Search Results, select display options in the Column Setup section. Select one of the following for each field:
|
Field |
Description |
|---|---|
|
Code Only |
Display just the code. |
|
Description Only |
Display just the description. |
|
Separate Columns |
Display the code and description in separate columns. |
|
Combine Columns |
Display the code and description in the same column. |
-
Click OK.
-
When processing is complete, the results depend on the format selected:
The reports are also saved to the user's eSchoolPlus report directory.
|
Field |
Description |
|---|---|
|
|
Displays the report in a separate browser tab. Use your browser's tools to save or print the file. |
|
Excel |
Saves the spreadsheet to your Downloads folder. |
Add course-sections
Add regular course-sections
-
Select Scheduling > Courses > Course Sections > Master Schedule.
-
On the Master Schedule Search page, click Add at the upper right.
-
On the Master Schedule page's Course panel, select the Building and Course. You may change the default Section number if needed.
-
On the Course-Section Information panel, enter the course-section's information.
-
On the Session Information panel, enter a session. A course-section must have at least one session.
-
Repeat Step 5 for each session you want to add.
-
Click Save.
-
To add another course-section, click Add at the upper right, then repeat Steps 2-7.
Add block course-sections
A block course-section consists of basic course information defining the block and a set of regular course-sections (blockettes). Students request the block, then are scheduled into the sessions stored in the blockettes. The block itself is not scheduled, because it does not include sessions.
-
Add each regular course-section (blockette) that you want to assign to the block by following the previous procedure.
-
Select Scheduling > Courses > Course Sections > Master Schedule.
-
Click Add at the upper right.
-
On the Master Schedule page's Course panel, select the block's Building and Course. You may change the default Section number if needed.
-
On the Course-Section Information panel, select B - Block Course as the Block Type, then enter the block's basic course information.
-
In the Blocked Course Information panel, use the Same Teacher field to set up linking, if needed.
-
Add each blockette by selecting the appropriate course.
-
If students who get scheduled should move as a class from one blockette section to another, enter the sections for the blockettes..
-
If students can be scheduled for any section of the blockette, leave the section blank.
-
If students must be scheduled into the blockette in order to be scheduled into other blockettes within the block, select the Mandatory checkbox.
-
-
Click Save.
Change course-sections
Change regular course-sections
-
Select Scheduling > Courses > Course Sections > Master Schedule.
-
On the Master Schedule Search page, click the Course link for the course-section you want to change You may need to run a search for the course-section.
-
On the Master Schedule page's Course-Section Information panel, change the values in the desired fields.
-
On the Session Information panel, you can:
-
Add a new session by clicking Add on the Session title bar, then entering the session's information.
-
Change a session by changing its field values.
-
Delete a session by clicking

(Delete) on the Session title bar.
-
-
Click Save.
Change block course-sections
-
Select Scheduling > Courses > Course Sections > Master Schedule.
-
On the Master Schedule Search page, click the Course link for the block course-section you want to change. You may need to run a search for the course-section.
-
On the Master Schedule page's Course-Section Information panel, change the values in the desired fields.
-
On the Blocked Course Information panel, you can:
-
Add a blockette by selecting a course and if needed, a section.
-
Add or change linking by changing the selection in the Same Teacher field.
-
-
Click Save.
Create alternate language descriptions for course-sections
-
Select Scheduling > Courses > Course Sections > Master Schedule.
-
On the Master Schedule Search page, run a search for the course-sections whose descriptions you want to translate.
-
On the Search Results title bar, click

(Additional options) on the far right, then select Define alternate language descriptions.
-
In the Language field that displays below the Search Results bar, select an alternate language, then click OK.
-
The page changes to display to display two columns on the right for the English description and the alternate language description.
-
Click Edit in the alternate language description column to display fields for entering translations.
-
Translate each description as needed.
-
Click Save to save your translations.
-
To return the search page to its original state, select

(Additional options) on the Search Results title bar, then select Exit alternate language description definition.
For information on how to set up and generate report cards in multiple languages, refer to Printing Alternate Language Report Cards.
Delete Records
Delete course-sections
You cannot delete a course-section that is scheduled.
-
Select Scheduling > Courses > Course Sections > Master Schedule.
-
On the Master Schedule Search page, select the

(Delete) checkbox for each course-section you want to delete.
-
Checkboxes only display for course-sections that are not scheduled.
-
Click Save on the upper right to delete the course-sections.
Delete sessions from a course-section
-
Select Scheduling > Courses > Course Sections > Master Schedule.
-
On the Master Schedule Search page, click the Course link for the course-section you want. You may need to run a search for the course-section.
-
On the Master Schedule page's Session Information section, click

(Delete) on the session's title bar.
-
Repeat Step 3 for each session you want to delete.
-
Click Save.
Delete blockettes from a block
-
Select Scheduling > Courses > Course Sections > Master Schedule
-
On the Master Schedule Search page, click the course-section link for the block course-section you want to change.
-
On the Master Schedule Course Information page, select the

(Delete) checkbox next to each blockette you want to remove.
-
Click Save.