
Use this page to view information for the criteria you use to calculate student's at risk based on progress reports. The setups are defined for each building.
View progress at risk setups
-
Select Administration > Interventions Setup > At Risk > Progress At Risk Setup.
-
If needed, enter criteria on the search page for a Simple or Advanced Search, and then click Load.
-
On the Search Results panel, click the setup's link.
Add progress at risk setups
-
Select Administration > Interventions Setup > At Risk > Progress At Risk Setup.
-
Click Add.
-
Complete fields as needed.
-
Click Save.
Change progress at risk setups
-
Select Administration > Interventions Setup > At Risk > Progress At Risk Setup.
-
If needed, enter criteria on the search page for a Simple or Advanced Search, and then click Load.
-
On the Search Results panel, click the setup's link.
-
Change values as needed.
-
To delete a value from a section that displays multiple rows, select the

(Delete) checkbox.
-
Click Save.
Delete progress at risk setups
-
Select Administration > Interventions Setup > At Risk > Progress At Risk Setup.
-
If needed, enter criteria on the search page for a Simple or Advanced Search, and then click Load.
-
On the Search Results panel, click the setup's link.
-
Click

(Delete).
-
Click Yes.
Fields
Definition Panel
|
Field |
Description |
|---|---|
|
Building |
Building associated with the at risk setup. |
|
At Risk Type |
Code for the at risk setup. Character/5 |
|
Description |
Description for the at risk setup. Character/255 |
|
Processing Order |
Order that the setup should be processed. If a student is disqualified by the first setup in the group, then the student is not processed by the next setup. Note Progress Eligibility Setups and Progress At Risk Setups are both stored in the same tables. The processing order is a key field and must be unique within both types of setups. For example, if you assign a processing order of 1 to an eligibility setup for building 1, then you cannot use 1 as the processing order for an at risk setup for building 1. |
|
Student Grades |
List of student grades that should be included in the at risk calculation. Select codes from the field's drop-down list, or click |
|
Active |
Checked if the at risk setup is active for the current year. |

At Risk Status for Qualified Students Panel
Use this panel to specify the at risk reason to assign to students and to specify when the student's at risk record should expire.
|
Field |
Description |
|---|---|
|
At Risk Reason |
Select the at risk reason to assign to the student when the student's progress report information falls below the threshold defined in the setup. |
|
Duration of Status |
Select the appropriate duration of the at risk reason assigned when a student meets this criteria. At the end of the period specified, the reason expires. When the at risk calculation is run, the reason will no longer display for the related factor on the student's At Risk Detail page. Select: SD - School Days - to specify that the at risk reason applies for the number of school (membership) days entered in the Number of Days field. For example, if a student should be at risk for 4 weeks of school days, enter 20.
Duration Type Examples (Quarter) Quarter - Use this option to specify that the at risk reason applies to the remainder of the current marking period. The expiration date for the reason will be set to the end date of the marking period as specified in the Marking Period Weeks record.
|
|
Number of Days |
Indicates the number of days the student would be at risk for the reason selected. This field can be accessed only if you selected School Days or Regular Calendar Days in the Duration of Status field. |
Calculation Panel
Courses Section
These fields affect how the at risk calculation evaluates the number of courses.
|
Field |
Description |
|---|---|
|
Include Courses Not Ended |
Checked if the number of courses for a student should include courses that are not completed. For example, select this checkbox if you want to run the calculation in marking period 3 and include courses that the student is taking in marking period 3 that end in marking period 4. |
|
Minimum Number of Courses |
Minimum number of courses that a student must take to not be considered at risk. For example, enter 8 if students must take 8 courses to have a full course load. The system checks scheduled courses for the student. If there is no minimum course requirement, leave the field set to 0 (zero). |
Mark Types Section
In this section, select the mark types to use to evaluate options in the Marks Panel.
Mark types are processed in the order shown. The calculation first uses the mark type in the top row. If that mark type is not found, then the calculation uses the mark type in the second row, and so forth. For example, if Sem (semester grade) is listed first and MP (marking period grade) is listed second, the calculation will use the Sem mark if found, otherwise the calculation uses the MP mark.
To change the order of marks, click the tab to the left of the Code field and drag and drop it to the appropriate location.
|
Field |
Description |
|---|---|
|
Code |
Code for the mark type to use. Select codes from the field's drop-down list, or click |
|
|
To delete a record, select the row's Delete checkbox, then click Save. |


Marks Panel
Blank Marks Section
|
Field |
Description |
|---|---|
|
Include Blank Marks in Calculations |
Checked if blank marks should affect the at risk calculation. |
|
Disqualify Based on Blank Marks |
Checked if students should be considered at risk based on the number of blank marks. |
|
Maximum Allowable Blank Marks |
Maximum number of blank marks that a student can have and still not be considered at risk. For example, enter 2 if the student is not at risk if two courses have blank marks, but is at risk if three courses have blank marks. |
Students are at risk if they have any of the following marks Section
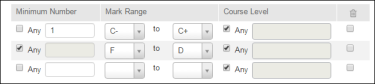
Each row includes a series of fields that determine how marks make a student at risk. The statement below illustrates how rules are defined:
(Minimum Number) marks of (Low Mark) to (High Mark) for (Course Level) courses.
For example, the following image shows a setup that makes a student at risk if the student has more than one C or any Ds or Fs:
|
Field |
Description |
|---|---|
|
Minimum Number |
Select the number of marks that disqualify the student.
|
|
Mark Range |
In the first field, enter the lowest mark that applies to this range. In the second field, enter the highest mark that applies to this range. |
|
Course Level |
Select the level of the courses that the rule applies to. You can apply the rule to any courses or to courses that use a specific level table.
|
|
|
To delete a record, select the row's Delete checkbox, then click Save. |

Comments Panel
|
Field |
Description |
|---|---|
|
Comment |
List of comments that indicate a student is at risk. If a student receives this comment for progress reports, the student will be considered at risk. For example, enter PC (Poor Conduct) if students are disqualified if the teacher has entered a comment indicating a behavior problem. |
|
|
To delete a record, select the row's Delete checkbox, then click Save. |
Absences Panel
|
Field |
Description |
|---|---|
|
Absence Type |
List of absence types to use as criteria. For example, if students cannot have more than three unexcused absences for a class, select the absence type for unexcused absences. Absence types are defined in the Absence Types option (Administration > Mark Reporting Setup > Setup > Absence Types) and totals may reflect absences for multiple attendance codes. |
|
Maximum Allowable |
Maximum absences that the student may have for a class for this absence type. If the student's total exceeds this number, the student will be considered at risk. For example, if students cannot have more than three unexcused absences, enter 3. |
|
|
To delete a record, select the row's Delete checkbox, then click Save. |