
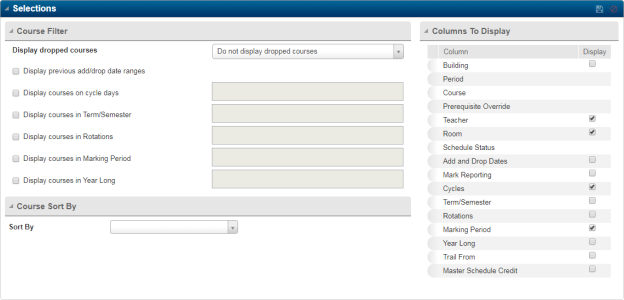
The Schedule Entry page's List mode provides the flexibility for you to personalize it to best fit how you prefer to work with student schedules. On the Selections panel, choose the schedule information to show and select the columns to display. Then click Save on the panel to use these settings every time you use Schedule Entry.
Typically, users prefer to either
-
view a student's current schedule and make schedule changes one course at a time
or -
mass edit a student's schedule by making changes in line within the schedule.
Your preference determines the fields you select to display.
To view the student's current schedule, display class information.

To mass edit schedules, display the add and drop dates, and mark reporting fields.

The following illustrates two ways you can personalize Schedule Entry, but you can adapt either one to include the fields you need to see. For example, if you want to be able to trail mark reporting for courses as you mass edit the schedule, then include the Trail From column in your settings. If you trail mark reporting information less frequently, you may opt not to include it in your schedule entry view, and then click the Course Description link to trail courses on the Student Course page as needed.
Tips:
-
Collapse the Student Information bar.
-
Scroll by clicking anywhere on the student's schedule, and then pressing an up, down, right or left arrow key.
-
Use the browser's full-screen mode by pressing F11. Switch back to your original browser size by pressing F11 again.
View Current Student Schedule
If you typically look at a student's schedule first and make changes one course at a time using the Student Course page, then use this view. In the Selections panel, select to show the teacher, room, and meeting information for courses, but not the details related to adding and dropping courses.
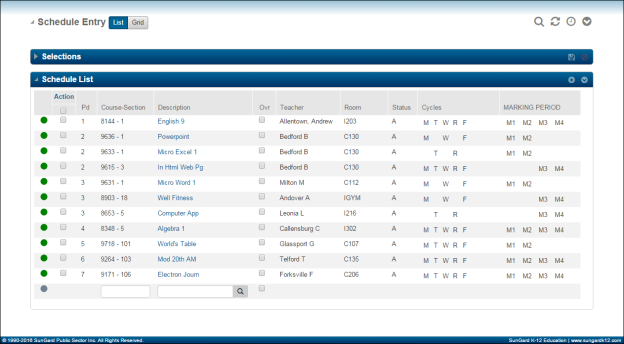
Make schedule changes as needed by clicking the Course Description link or the Add icon.
Edit Student Schedule
If you make most schedule changes in line within the student's schedule, then use this view. In the Selections panel, select to show the add and drop date fields and the mark reporting options for courses, but not the class details.

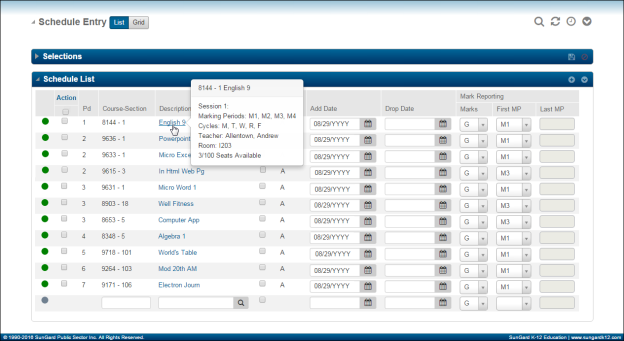
Add and drop courses on the Schedule Entry page. To view the teacher, room, days, or marking periods, move the mouse pointer over the course description. Click the Course Description link to display the Student Course page to resolve a course, change its status, or trail mark reporting information.
Tip:
Use keyboard shortcuts when entering dates. Press t to default today's date or + to increase the displayed date by one.