
Click Notifications in the TAC Banner to display notifications sent to you. The number of unread notifications displays in front of Notifications.
Using the Notifications Viewer
Note: Your browser settings determine whether the viewer displays as a new pop-up window or as a tab within an open window. With the Notifications viewer in a separate browser window, you can move it to a second video display to continuously monitor your notifications.
Notifications Viewer Toolbar Options
|
Option |
Description |
|---|---|
|
|
Unread Notifications Indicator The number of unread notifications displays in the indicator in the upper left corner of the Notifications Viewer. Note: If the number of unread notifications exceeds 99, "99+" displays in the indicator. |
|
|
Expand/Collapse Button
|
|
|
Select All/Deselect All Box This function works in conjunction with the "With Selected" field.
|
|
With Selected |
The options in this field allow you to apply an action to all selected notifications. Select: Delete to delete any selected notification. Mark Read to change any selected notification to appear to have been read. The subject heading will not display in bold and the message status indicator displays as Mark Unread to change any selected notification to appear to not have been read. The subject heading displays in bold and the message status indicator displays as Note: These actions are applied immediately. There is no confirmation prompt. If you delete a notification by mistake, you can restore notifications you have deleted within the last 7 days. |
|
Sort By |
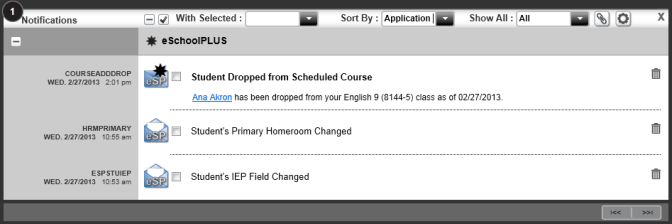
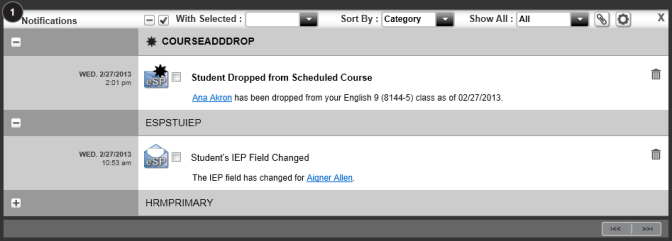
Select how you want to display groups of notifications in the viewer. You can sort notifications by Date, Application, or Category. Sort By Date Sample |
|
Show All |
The options in this field allow you to filter the notifications that display in the viewer. Select: All to display both read and unread notifications. Deleted to display only notifications you deleted within the last 7 days. Unread to display only notifications that have not yet been read. |
|
|
Click to set up the viewer to display notifications from all PLUS 360 applications you use, where applicable. Clicking this button opens the PLUS 360 Application Link |
|
|
Click to view or update your notification subscription preferences in the Notification Subscription page |
|
|
Click to launch the Notifications Viewer in a new browser window. This option displays only when the viewer window displays in a pop-up window. |
|
|
Click to close the Notifications Viewer. |
|
|
Click |
|
|
Next/Previous Buttons If there are a large number of notifications, the buttons in the lower right corner of the viewer window allow you to navigate between the next and previous pages. When a button is highlighted, click the appropriate button to display the next >> or previous << page. If neither button is highlighted, no additional notifications exist. |


Notification Viewer Tasks
Expand or collapse individual sections
Click 

-
-
Expand a section to display all notifications in the group by clicking
-
Collapse a section to hide all notifications in the group by clicking
-
Expand or collapse all sections
Click
-
-
Expand all sections by clicking
-
Collapse all sections by clicking
-
Change a notification's message status (mark notifications as read or unread)
Click 
-
-
Unread: The notification message heading displays in bold text, and the message status indicator displays as

-
Read: The notification message heading displays in normal text, and the message status indicator displays as

-
Delete notifications
Notifications remain in the viewer for the number of days specified in the POD Configuration Utility, after which time they are automatically deleted. You can manually delete messages, as well as restore notifications you deleted within the last 7 days.
To delete individual notifications:
-
-
Click

-
To delete multiple notifications:
-
-
Click
-
To delete all notifications:
-
-
Click

-
Note: When you select to delete a notification, no confirmation dialog displays. You can, however, restore notifications you have deleted within the last 7 days using the next procedure.
Restore deleted notifications ("undelete")
In the Show All field, select Deleted to display the notifications that you have deleted within the last 7 days, then use one of the following methods to restore deleted notifications:
-
-
Restore individual notifications: Click

-
Restore multiple notifications: Click
The restored notification(s) display in the viewer window after you select All in the Show All field.
-
-
-
Restore all notifications: Click
-
View the Student Summary page for a student
Click the student name link in a notification to display the Student Summary page for that student. Not all notifications contain links to other pages.