
Use this page to process an upload interface to either verify the upload definition or update and/or insert eSchoolPlus records based on the data file and upload definition. When the Run Upload option completes, review the Interface Upload Log.
Transfer the Data File to your Report Directory
-
Select Administration from the main menu, select Utilities submenu, select Download & Upload, and then select Upload File.
-
In the File field, click the Choose File button to search for and select the file you want to upload.
-
Click

(Upload Records).
-
Click Tasks/Reports to verify that the file was uploaded to your report directory.
Upload Data
-
Select Administration from the main menu, select Utilities submenu, select Download & Upload, and then select Run Upload.
-
Verify that your interface is defined correctly for the data file by setting the Run Mode to Verify upload data without updating database and click Run.
-
Click Tasks/Reports and open the Interface Upload Log and review the SQL to verify that data will be correctly updated or inserted.
-
If the SQL is not correct, review the data file and the import definition. Then make the necessary corrections to the definition. After you have changed the import definition, repeat steps 1 - 3 until the SQL is correct.
-
Select Administration from the main menu, select Utilities submenu, select Download & Upload, and then select Run Upload to open the Run Upload page.
-
If you want to back up test data before you run the import, click

(Additional options), then select Backup.
-
Run the upload in update mode by setting the Run Mode to Run Upload and click Run.
-
Click Tasks/Reports and open the Interface Upload Log to review any errors.
-
Check records that were loaded to verify that records are correct.
-
If you are not satisfied with the results of the import and you ran a backup before you uploaded data, you can restore data from the backup. Select Administration from the main menu, select Utilities submenu, select Download & Upload, and then select Run Upload. Click

(Additional options), and select Restore.
Caution
Use caution when using the Backup and Restore options if more than one user runs uploads or updates testing information within the district. The backup option backs up all data in the tables processed by the interface. It does not selectively process a building or test. Thus, if another user updates testing data between the time of the backup and restore, the user's data will be lost.
Fields
Prompts Panel
|
Field |
Description |
|---|---|
|
Interface ID |
Upload interface you want to run. |
|
Run Mode |
Select the mode in which you want to run the upload. Select:
|
|
Insert New Records |
Checked if you want the upload to create new records based on data in the data file. |
|
Update Existing Records |
Checked if you want the upload to update existing records. |
|
Only Update Blank Fields |
Checked if you want the upload to only update fields that are blank. |
|
Import Directory |
Path where the source file is stored. Select:
This Directory refers to the path being used must be accessible from the server the software is running on. |
Program Tracking Panel
This panel displays only if you selected an Interface ID for an Upload Definition that includes a program-tracked field. Use this section to determine how the upload will handle Start and End Dates for program vectors when the data file program value differs from the source field's value. For general information on uploading program-tracked data, refer to Uploading Data to Program Tracked Fields.
Program End Date
If the Upload Definition includes program-tracked data, use this field to select the method for assigning a program-vector End Date. This is needed if the program value in the upload file differs from the existing source field value. For information on when this setting is referenced, refer to Uploading Data to Program Tracked Fields.
Select:
-
-
Close existing program vectors with this end date - to enter the End Date the upload will use for closing the old program vector.
-
Close existing program vectors using the last date prior to the start date of the new vector - to have the upload determine the End Date for the old vector based on the method you use for determining Program Start Date in the new program vector that opens. Once the Start Date is determined, the upload uses the calendar date immediately prior as the End Date for closing the old vector.
-
Close existing program vectors using date from file - to select a date field from the data file as the End Date. When you select this option, a table becomes active showing all the Interface Headers from the Upload Definition that include a program-tracked field. Following is an illustration:
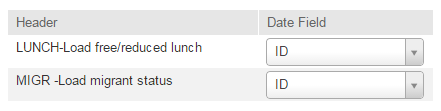
In the Date Field, choose the field in the data file that will serve as the End Date whenever a program-vector is closed through the upload processing. Select a data file field for each Header listed.
-
Program Start Date
If the Upload Definition includes program-tracked data, use this field to select the method for assigning a program-vector Start Date when the system is closing one vector and opening another. This is needed if the program value in the upload file differs from the existing source field value. For information on when this setting is referenced, refer to Uploading Data to Program Tracked Fields.
Select:
-
-
Create new program vectors with this start date - to enter the Start Date the upload will use for opening the new program vector.
-
Create new program vectors using date from file - to select a date field from the data file as the Start Date. When you select this option, a table becomes active showing all the Interface Headers from the Upload Definition that include a program-tracked field. Following is an illustration:
In the Date Field, choose the field in the data file that will serve as the Start Date whenever a program-vector is opened through the upload processing. Select a data file field for each Header listed.
-
Students without Existing Open Programs
If the Upload Definition includes program-tracked data, use this field to select the method for assigning a program-vector Start Date when the student does not already have an open vector. For information on when this setting is referenced, refer to Uploading Data to Program Tracked Fields.
Select:
-
-
Use the Program Start Date specified above for all students - to set the Start Date using the method defined in the Program Start Date field.
-
Use the student's most recent entry date if the student does not have an existing program vector - to use the Entry Date from the student's most recent Entry/Withdrawal record.
-