
Tenants are used to set up single sign-on for eSchoolPlus, Teacher Access Center, or Home Access Center and to configure the ability to switch between PowerSchool applications. The tenant defines the settings used to authenticate access using the identity provider. Additionally, tenants include the unique identifier for the district used when switching between PowerSchool applications.
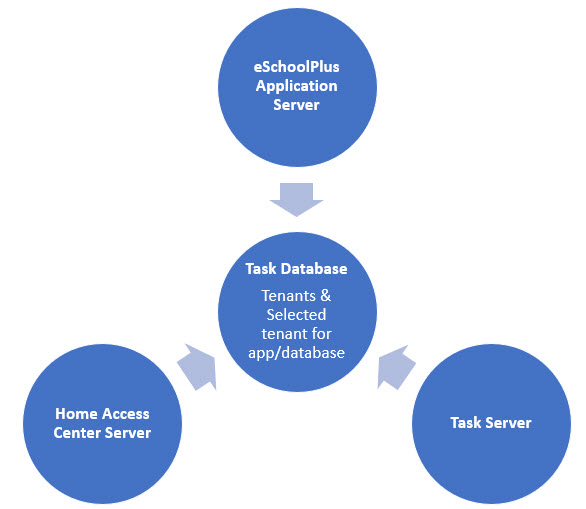
Tenants Stored in Task Database
Tenant information is stored in the Task database for the environment. The District Configuration Utility can be managed from multiple environments, but there can only be one set of information for each unique tenant. If you make changes to the settings for a tenant, you will be prompted to verify that you want to overwrite the existing settings. When you make changes to tenant settings on one server, you must open the configuration file on all other servers in order to load the tenant information from the Tasks database and then save the updated configuration files so servers are in synch.
Required IdP Information to Set Up Tenant for SSO
To set up single sign-on, you must first register the application with the external identity provider. Then, you'll set up a tenant for the identity provider in the District Configuration Utility. You'll need the following information from the IdP to set up the tenant.
-
Identity Provider URL
-
Name of the claim that stores the Global ID used by eSchoolPlus
-
List of scopes required when redirecting the user to the identity provider
-
Client ID and Client Secret were generated when the application was registered with the identity provider
-
If the district uses the Master Schedule Whiteboard, then you'll also need to set up a "public" application, and you must provide the Client ID and Client Secret for the public application. Note that Microsoft does not provide a client secret for public applications, so only a Client ID will be needed.
Required Application GUID to Set Up Tenant for App Switching
To configure eSchoolPlus and Teacher Access Center so you can switch between PowerSchool applications, PowerSchool must first set up your district applications. When the products are added, a GUID will be created for the district. You'll need this information for the persona that you are setting up in the tenant.
Update the District Configuration File to Define Tenants for Applications
Tenant records are stored in the Tasks database. Although the District Configuration Utility is configured on multiple servers in the environment, there can only be one tenant selected per application for a district/database. The directions below guide you through updating the configuration files to avoid having tenant information overwritten.
-
Determine if your district is utilizing either of these features. If you are, continue with steps 2 through 3. Otherwise, skip to Step 4.
-
SSO configuration for eSchoolPlus, Teacher Access Center, or Home Access Center for parents and/or students
-
App Switcher configuration for eSchoolPlus or Teacher Access Center
-
-
Before making changes to the DCU, verify that the DCU config file is closed for each application server to make sure that all application servers get updated properly. There is only one set of Tenants stored for the environment. To avoid issues where the tenants may be incorrectly overwritten, all application servers must be set to the same values.
-
If needed, add or update tenant settings.
-
Update the District Information for the districts you want to configure the above-mentioned features for.
-
Select the District List tab.
-
Click a district to display the District Information window.
-
If configuring eSchoolPlus for SSO or App Switcher, select the appropriate eSchoolPlus Tenant configuration from the drop-down list.
-
If configuring Teacher Access Center for SSO or App Switcher, select the appropriate Teacher Access Center Tenant configuration from the drop-down list.
-
If configuring Home Access Center for SSO for parents, select the appropriate Home Access Center Parent Tenant configuration from the drop-down list.
-
If configuring Home Access Center for SSO for students, select the appropriate Home Access Center Student Tenant configuration from the drop-down list.
-
Click OK to return to the main District List tab.
-
If you have more than one eSchoolPlus database that you want to configure for these features, repeat Steps 2b through 2g for each database.
-
-
Select File – Save to save the configuration.
-
Click OK to confirm.
-
Select Tools – Create App Config Files, then click All to create new configuration XML files, and then click OK to confirm.
-
For the other application servers, open the config file to sync the Tenant values entered in Steps 3 and 4. Then, repeat Steps 5-7 to save the config file.
-
Select File – Exit to close the DCU.
Create a tenant
-
Click Tenant Information at the bottom left corner of the Tenants tab.
-
In the new Tenant Information window, you can add a tenant record containing the identity provider information for the district.
-
For field descriptions, refer to the Tenant Information Window.
-
When you are done adding information, click OK.
-
After you add a tenant, you can update the District Information record for the district to specify the tenant to use for eSchoolPlus, Teacher Access Center, or Home Access Center and save your changes to the configuration file.