Review Data
To Review Data:
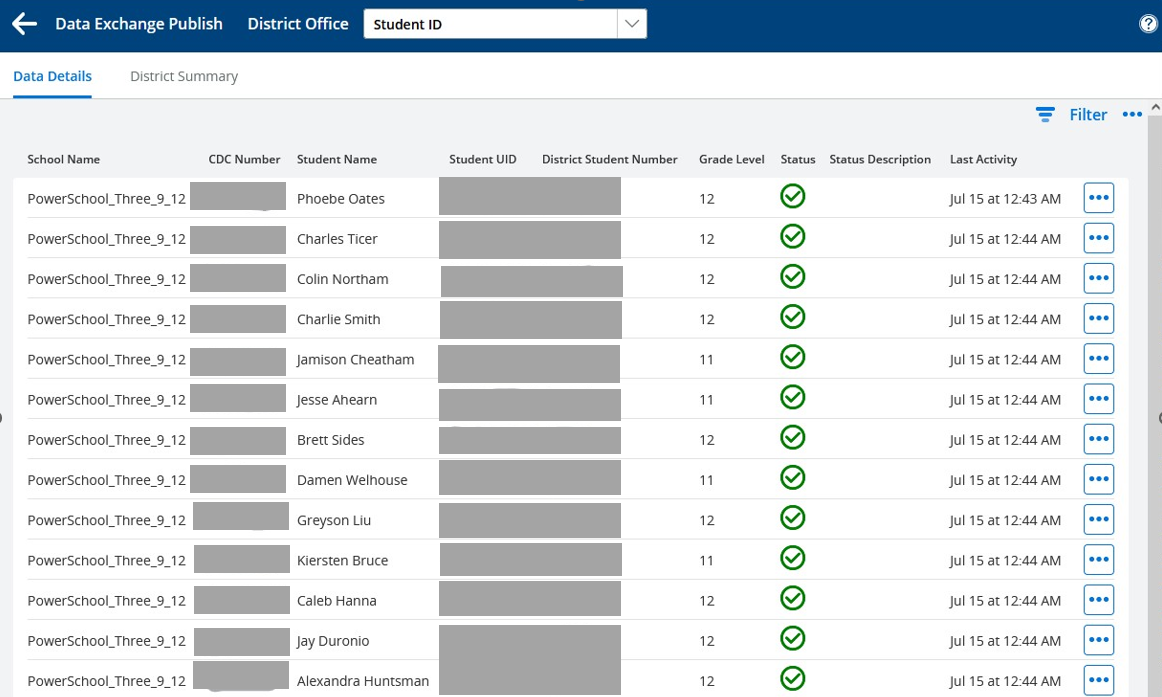
Click the resource name on the Dashboard to display a list of published or processed records. For example, clicking Student ID shows the Data Details page for all processed Student ID records.

Data Details page
Return to Dashboard:
On the Data Exchange Publish page, click the Go back option (left arrow) to return to the Dashboard.
Dashboard View:
You can switch between the District Office and School views in the dashboard.
Check the top of the page for District Office. This indicates the Dashboard context.
If a school was selected on the Dashboard, the school name will be displayed.
View Entity Name:
Select the entity name for which you want to view the records.
Notice Student ID displayed across the top of the page as the selected entity name.
In the district context, all Student ID records in the district are included.
If a school was selected on the Dashboard, the list of records is limited to those at the selected school.
List pages with the district context include the school name and CDC number.
List pages with a school context do not include identifying data.
Look at the right-most columns on list pages to see status and activity information for all entities.
Note that other columns will vary depending on the entity. Each entity includes key elements and other helpful data for identifying and troubleshooting.
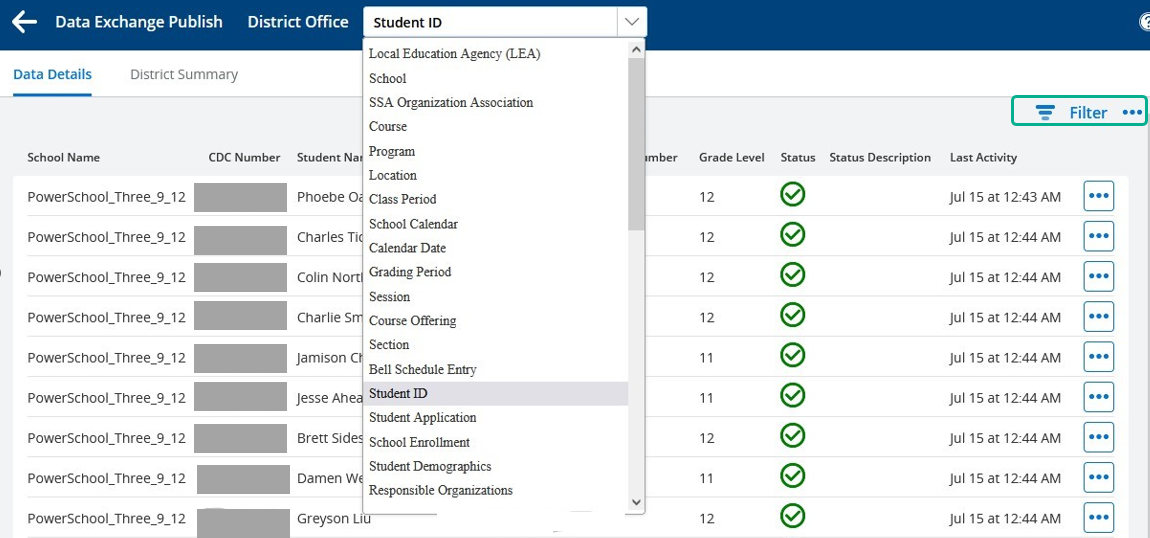
The entity name, Student ID, is displayed in a dropdown menu. Use this menu to switch from one List page to another without returning to the Dashboard.

Switch from one List page to another
Sort Data:
Click the Title of any column to sort the data.
The first click sorts the data from first-to-last.
The second click sorts the data from last-to-first.
Use this option on Status column. Clicking it once will sort dependencies and errors to the top of the list.
Filter Data:
Every list page includes a filter at the top right of the page.
You can filter based on any of the columns displayed on the page.
Click the Filter to display the filtering options.
For example, selecting Grade Level and then typing 12 in the right-hand box will limit the selection to students in grade 12.
Select Grade Level. Once the page refreshes, type 12 to apply the grade level filter.

Filter data

Applying grade level filter
Select a filter: When you choose a filter, the + icon next to it becomes active.
Add another filter:
Example 1: Click the + icon, select Student Name from the dropdown, refresh the page, and type smit into the filter box.
Example 2: Click the + icon again, select Student UID from the dropdown, and type 2 into the filter box.
View entered filters: Each filter youve entered appears in a blue box with the value and an x on the right.

View entered filters
Remove a filter: Click the x on any blue box to remove that specific filter. Other filters will remain.
Clear all filters: Click Clear All to remove all filters, including the most recent one, from the top of the page.
d. To limit the list to error or dependency records:

Review error or dependency records
Go to the Filter options and select Status.
A dropdown menu will appear. Choose the status you want to review.
Dependencies and errors will display the dependency reason or the returned error message under Status Description, if available.
Note: Selecting more than one status option at a time may cause the filter to not work as expected. Typically, the last option selected will take precedence, and others will be ignored.
Record Details: Click More… next to a record on any list page to see the available actions.

Record details
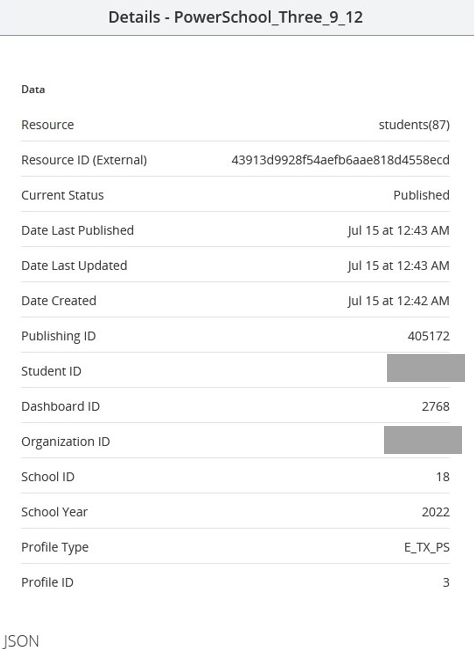
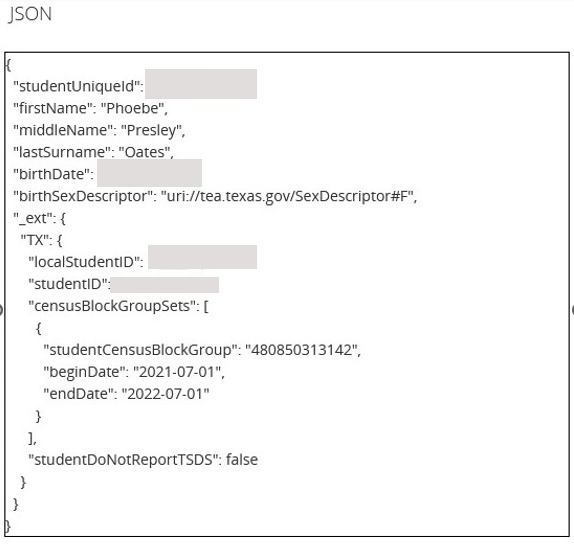
Details: This section displays publishing details, including the actual JSON sent to the ODS.
Resource:
Shows the Entity name and DEX identifying code.
Resource ID (External):
Displays the GUID returned from the ODS when the record is successfully published.
Internal Identifiers:
Publishing ID, Dashboard ID, Profile ID: Internal DEX identifiers.
Student ID:
The internal SIS student record identifier.
PowerSchool: STUDENTS.Id (StudentId in other tables)
eSchoolPlus: REG.STUDENT_GUID
Organization ID:
The published school or district state identification number.
School ID:
The internal SIS record number for the school.
PowerSchool: SCHOOLS.School_Number
eSchoolPlus: REG_BUILDING.BUILDING

Publishing details
JSON Content
The JSON content of the message is sent to the ODS.
Note: JSON is not included for dependency records (JSON is not constructed for records held in dependency).
Error records: JSON content is removed after a few days. It can be reinstated by republishing a single record or all error records for the category.

JSON content
Returning to List
Click Close to return to the list.
Republishing Records
To republish, initialize republishing for a single record.
Deleting Records
To delete, send a Delete event to the ODS for a single record.
Note: The Delete event is sent without any validation, so even if a record is valid, it will still be deleted.
Republishing changes for the category will republish the record if it is still valid.
This option is rarely used but can be helpful for some intermittent scenarios or for testing purposes.
